In Android Development, the most effective ways to present lists or grids of data is a RecyclerView. It’s highly utilized for the representation of long data lists, which can be messages in a chat, products in an online store, or even images in a gallery. In this lesson, you are going to build a RecyclerView step by step and explain in detail all of its elements with a custom example.
1. What is RecyclerView?
The RecyclerView is an Android ViewGroup for providing a UI for ‘large’ sets of data with better performance than earlier ones, like ListView. When an app has a large dataset, the RecyclerView provides a more flexible and efficient way to display a list of items when a user scrolls.
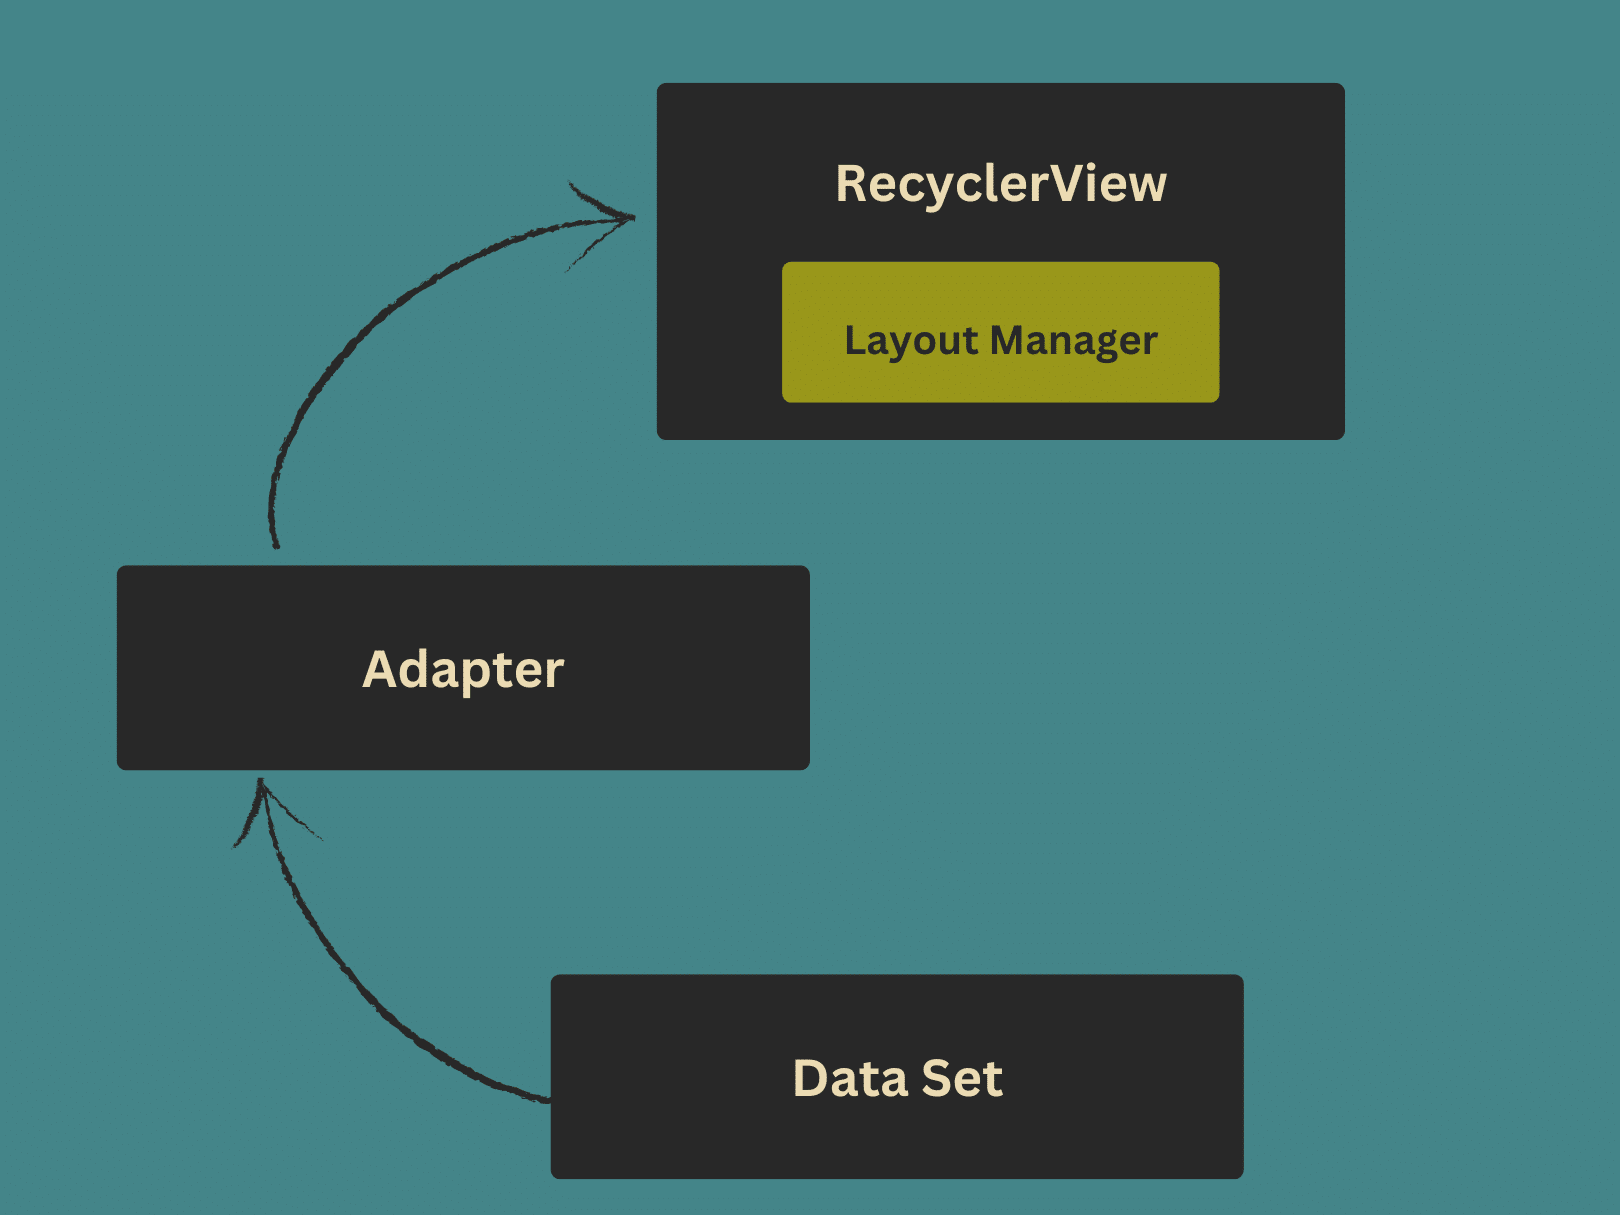
Key Components of a RecyclerView:
- Adapter: Bridges the data source and the RecyclerView.
- ViewHolder: Describes the item views and provides a reference to them.
- LayoutManager: Determines how the data items are arranged, e.g., in a grid or a vertical list.
But first, here is how you might do that in your app.
2. Example Project: Displaying a List of Movies in a RecyclerView
Objective:
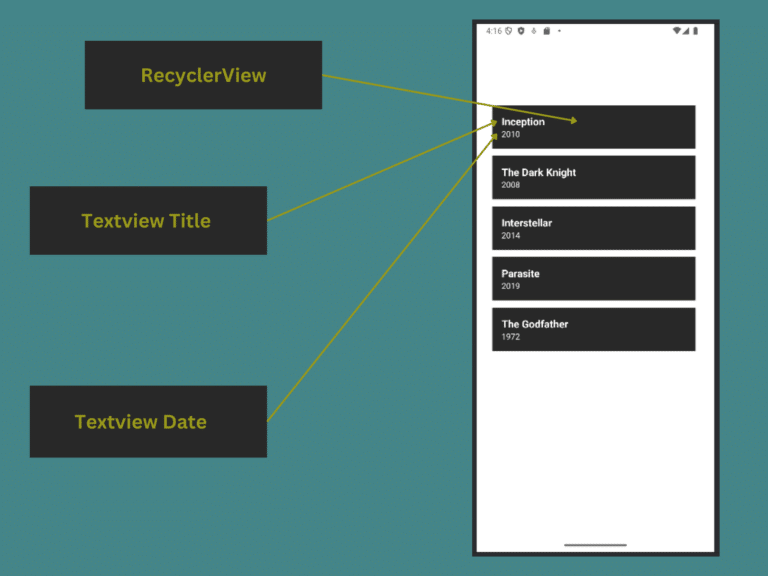
We will create a simple Android app that displays a list of movies. Each movie will have a title and a release year, displayed in a vertical list using a RecyclerView.
Steps Overview:
- Add the RecyclerView to your layout.
- Create an item layout for individual list items.
- Set up the Adapter and ViewHolder classes.
- Initialize the RecyclerView in the Activity.
- Bind the data to the RecyclerView.
3. Setting Up RecyclerView in Layout
First, define the RecyclerView in your activity’s layout XML file. In this case it will be activity_main.xml.
activity_main.xml:
<androidx.constraintlayout.widget.ConstraintLayout xmlns:android="http://schemas.android.com/apk/res/android" xmlns:app="http://schemas.android.com/apk/res-auto" android:layout_width="match_parent" android:layout_height="match_parent">

    <androidx.recyclerview.widget.RecyclerView android:id="@+id/recyclerViewMovies" android:layout_width="0dp" android:layout_height="0dp" android:clipToPadding="false" android:padding="16dp" app:layout_constraintTop_toTopOf="parent" app:layout_constraintBottom_toBottomOf="parent" app:layout_constraintStart_toStartOf="parent" app:layout_constraintEnd_toEndOf="parent"/>

</androidx.constraintlayout.widget.ConstraintLayout>
How it looks like
Explanation:
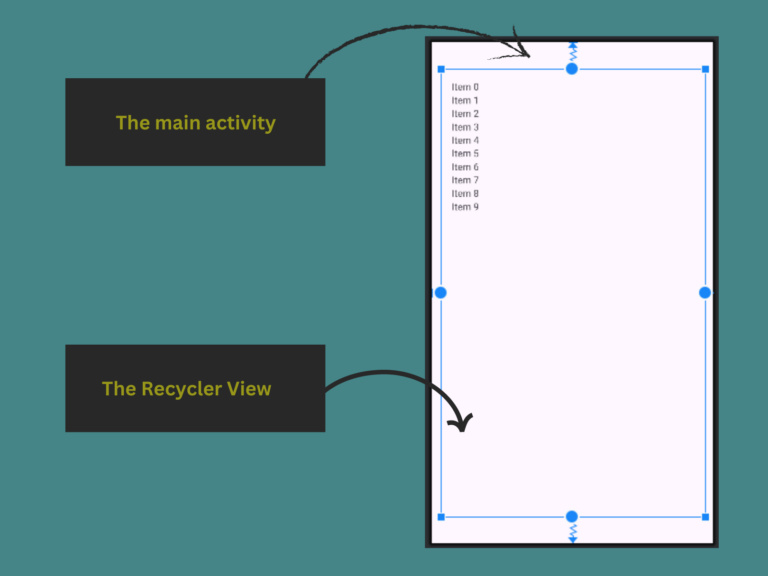
- The RecyclerView is inside a ConstraintLayout and fills the entire screen.
- It has an ID
recyclerViewMovies, which we will reference later in the activity. - We are using
ConstraintLayoutfor flexibility, but you can use any layout likeLinearLayoutorRelativeLayout.
4. Creating the Layout for Each Movie Item
Secondly, we must define what each movie will look like. For this, we will create a separate layout file: item_movie.xml which will be used for each item in our RecyclerView.
item_movie.xml:
<LinearLayout xmlns:android="http://schemas.android.com/apk/res/android" android:layout_width="match_parent" android:layout_height="wrap_content" android:background="#282828" android:orientation="vertical" android:padding="16dp">

    <TextView android:id="@+id/textViewTitle" android:layout_width="wrap_content" android:layout_height="wrap_content" android:textSize="18sp" android:hint="sample text" android:textColorHint="@color/white" android:textStyle="bold" android:textColor="@android:color/black"/>

    <TextView android:id="@+id/textViewYear" android:layout_width="wrap_content" android:layout_height="wrap_content" android:textSize="14sp" android:textColor="@android:color/darker_gray"/>

</LinearLayout>
Explanation:
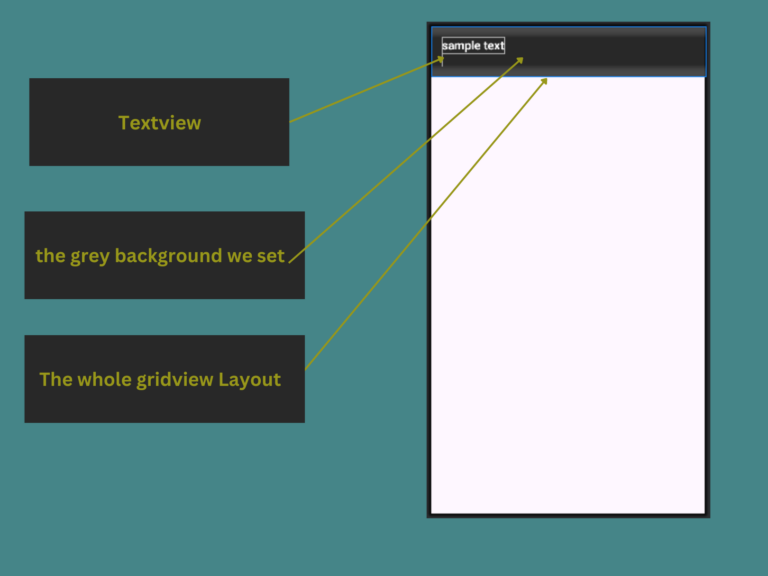
- We use a LinearLayout to arrange the two TextViews (for the movie title and release year) vertically.
- TextView (Title): This will display the movie title, styled in bold and a larger font size.
- TextView (Year): This will show the movie’s release year with a smaller, gray font for differentiation.
How it looks like
5. Setting Up the Adapter and ViewHolder
The Adapter is responsible to create the view (for each item in the list) and bind the data into this views. The ViewHolder the view and save to cache. This way we are not calling the findViewById method every time.
MoviesAdapter.kt
package com.example.movierecyclerview import android.view.LayoutInflater import android.view.View import android.view.ViewGroup import android.widget.TextView import androidx.recyclerview.widget.RecyclerView // Movie data class for simplicity data class Movie(val title: String, val year: String)

// Adapter for RecyclerView class MoviesAdapter(private val movieList: List<Movie>) : RecyclerView.Adapter<MoviesAdapter.MovieViewHolder>() {

    // ViewHolder class class MovieViewHolder(itemView: View) : RecyclerView.ViewHolder(itemView) {
        val titleTextView: TextView = itemView.findViewById(R.id.textViewTitle)
        val yearTextView: TextView = itemView.findViewById(R.id.textViewYear)
    }

    // Creates the ViewHolder and inflates the item layout override fun onCreateViewHolder(parent: ViewGroup, viewType: Int): MovieViewHolder {
        val itemView = LayoutInflater.from(parent.context)
            .inflate(R.layout.item_movie, parent, false)
        return MovieViewHolder(itemView)
    }

    // Binds data to the ViewHolder for each item override fun onBindViewHolder(holder: MovieViewHolder, position: Int) {
        val movie = movieList[position]
        holder.titleTextView.text = movie.title holder.yearTextView.text = movie.year
    }

    // Returns the size of the dataset (called by RecyclerView) override fun getItemCount() = movieList.size
}
Explanation:
Movie Data Class:
- A simple data class (
Movie) holds the movie title and year.
- A simple data class (
MoviesAdapter Class:
- This adapter takes in a list of
Movieobjects. - The adapter is responsible for:
- Creating a new ViewHolder (
onCreateViewHolder). - Binding the data to the ViewHolder (
onBindViewHolder). - Returning the total number of items (
getItemCount).
- Creating a new ViewHolder (
- This adapter takes in a list of
ViewHolder Class:
- The
MovieViewHolderclass extendsRecyclerView.ViewHolder. It holds the references to the TextViews (titleTextViewandyearTextView) for caching purposes. - This avoids repeated calls to
findViewById, which would be inefficient if done for every item during scrolling.
- The
6. Initialize RecyclerView in the Activity
And now, let’s bring all of this together in the main activity. Let’s initialise the RecyclerView, set up the adapter, and provide the list of movies.
MainActivity.kt
package com.example.movierecyclerview

import android.os.Bundle
import androidx.appcompat.app.AppCompatActivity
import androidx.recyclerview.widget.LinearLayoutManager
import androidx.recyclerview.widget.RecyclerView

class MainActivity : AppCompatActivity() {

    override fun onCreate(savedInstanceState: Bundle?) {
        super.onCreate(savedInstanceState)
        setContentView(R.layout.activity_main)

        // Get reference to RecyclerView val recyclerView: RecyclerView = findViewById(R.id.recyclerViewMovies)

        // Create a list of Movie objects val movieList = listOf(
            Movie("Inception", "2010"),
            Movie("The Dark Knight", "2008"),
            Movie("Interstellar", "2014"),
            Movie("Parasite", "2019"),
            Movie("The Godfather", "1972")
        )

        // Set up RecyclerView with a LinearLayoutManager and the adapter
        recyclerView.layoutManager = LinearLayoutManager(this)
        recyclerView.adapter = MoviesAdapter(movieList)
    }
}
Explanation:
RecyclerView Reference:
- We get a reference to the RecyclerView using
findViewById(R.id.recyclerViewMovies).
- We get a reference to the RecyclerView using
Creating the Movie List:
- A list of
Movieobjects is created, each containing a movie title and its release year.
- A list of
Setting the LayoutManager:
- We use
LinearLayoutManagerto display the list vertically. This is the most common layout manager, but you could also useGridLayoutManagerorStaggeredGridLayoutManagerfor different layouts.
- We use
Setting the Adapter:
- The
MoviesAdapteris set as the adapter for the RecyclerView. It takes the list of movies as its dataset.
- The
7. Explanation of the Core Concepts
7.1 RecyclerView
A RecyclerView is a flexible, efficient way to display scrollable lists of data. It uses a pool of views and recycles them as you scroll to reduce memory usage, unlike ListView, which recreated views unnecessarily.
7.2 Adapter
The Adapter acts as a bridge between the dataset and the RecyclerView. It inflates the layout for each item and binds the data to those views. It handles creating the ViewHolder, binding data to it, and managing the number of items.
7.3 ViewHolder
A ViewHolder is a wrapper around the view of an item in the RecyclerView. It contains references to the views (e.g., TextViews) inside that layout. The ViewHolder improves performance by reducing the number of findViewById calls.
7.4 LayoutManager
The LayoutManager determines how items in the RecyclerView are arranged (linear list, grid, staggered grid, etc.). Common layout managers include:
- LinearLayoutManager: For vertical or horizontal scrolling lists.
- GridLayoutManager: For grid-like arrangements (e.g., images in a gallery).
- StaggeredGridLayoutManager: For grids where items may have varying sizes.
The final Results